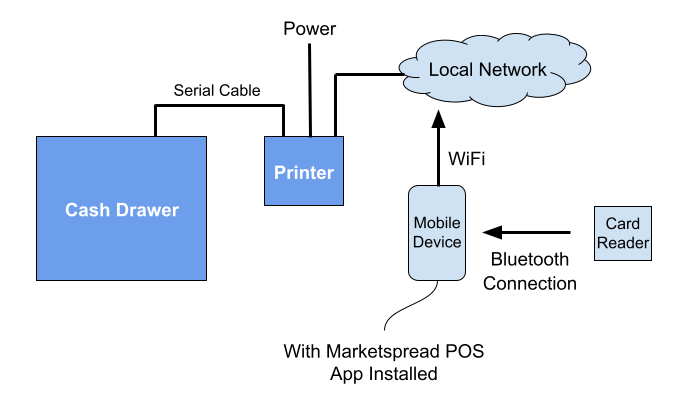
The Marketspread Terminal is a gateway that allows you to connect a full cash register to Scheduler to accept cash and credit payments in person.
There are four things needed for the Marketspread Terminal:
- Cash Drawer
- Star MCP30 Printer
- BBPOS Bluetooth Card Reader
- Mobile device with the Marketspread POS app installed
See the diagram below to see how the all connect.
Note that all the required hardware (minus the Mobile Device) can be purchased from our online store at the following address.
https://store.marketspread.com/
Feel free to email us at [email protected] if you have any questions on aquiring the necessary hardware.
Once all the hardware is setup and both the Printer and Mobile Device are connected to your network (Note: the printer is hard cabled to your local network, mobile device is connected via WiFi) you will want to start Terminal Mode on the Marketspread POS app.
To start Terminal Mode:
1. Log into the Marketspread POS app on your mobile device. It will be the same username and password that you use to log into your Marketspread account.
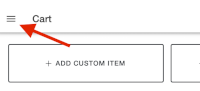
2. Click on the three line icon at the top right and select "Settings" (see image below)
3. Find the Hardware Settings Section and click the "press to connect" for the Bluetooth Card Reader and Receipt Printer (see image below)
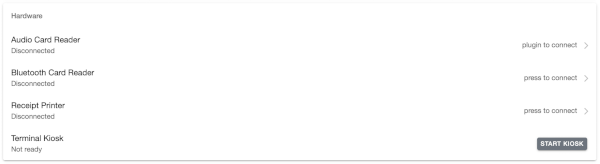
Note: The Bluetooth Card Reader must be powered on for the POS App to discover it and the Printer must be powered on and connected to the internet as well.
With the printer connected you will also be able to print a test receipt and open the cash drawer from the POS App. From the POS App Settings page click on the printer under the Hardware section to get a screen similar to the one below.
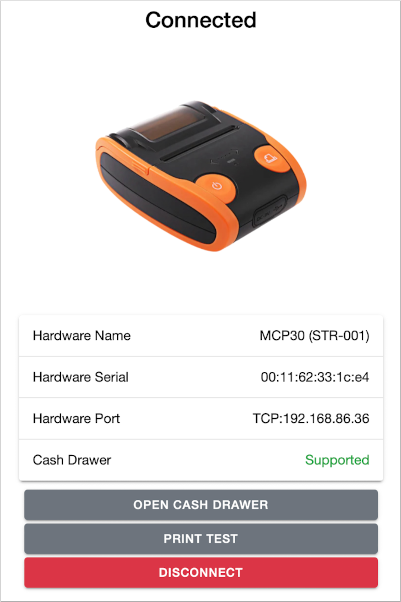
To test the cash drawer simply press the grey OPEN CASH DRAWER button.
To test the printer simply press the grey PRINT TEST button.
4. After both the Printer and Card Reader are connected, in the POS App Settings page, just under the Printer and Card Reader settings, press the grey START KIOSK button in the Settings (see screenshot below).

This will ask you to enter a four digit code to unlock KIOSK mode. Make sure to enter a code you can remember.
Once the code is entered your mobile device screen will display your Market or Event name and logo. You are now in Terminal Mode and ready to accept cash and credit card payments with the Cash Register.
To exit Terminal KIOSK Mode simply press and hold on your logo. This will prompt you for your KIOSK passcode. Enter it to unlock KIOSK mode.
To use Terminal Mode, go to your Marketspread Dashboard on your Laptop or Computer. At the top you should see a mobile device icon similar to the one show below.
![]()
Click on it to connect to your Terminal KIOSK. It will have an option to Connect to Device. Once you select that you will get a sceen similar to the one below.
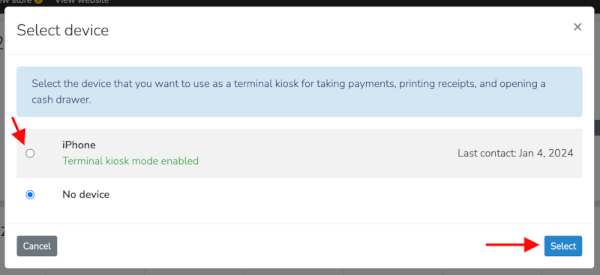
Select the device that is currently running your Terminal KIOSK mode. In the case above it is the iPhone. Then press the blue Select button at the bottom right.
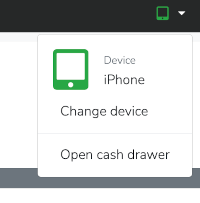
Now you are connected to the Terminal KIOSK and the top toolbar icon will show as green.
![]()
If you click on the icon in the top toolbar it will give you the open to open the cash drawer and to change the connected Terminal device.
Using Marketspread Terminal Mode to take payments:
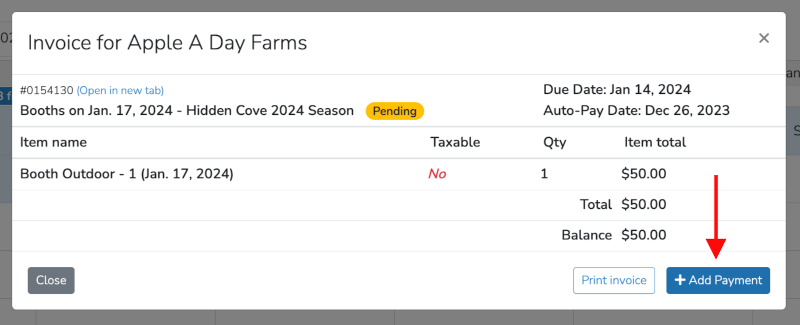
1. Go to Scheduler and open an invoice then click the blue + Add Payment button (see screenshot below)
2. Select the Pay via terminal option and click the blue Send to terminal button at the bottom right

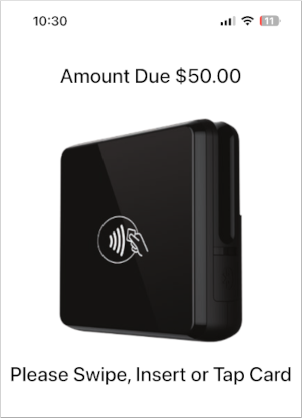
3. Your Mobile device will now display the amount due. Use the connected card reader to take credit card payment (tap, dip or swipe)
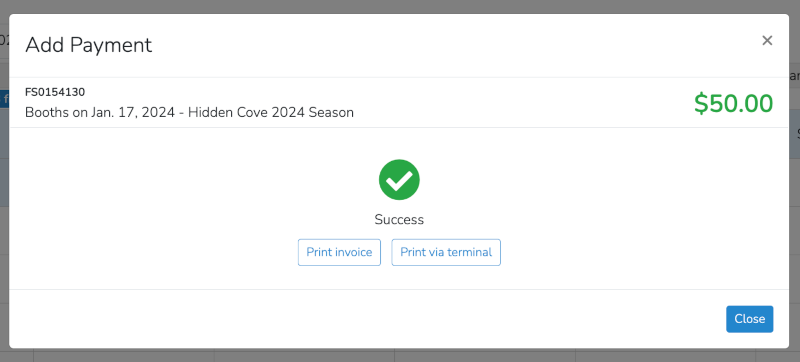
4. It will take about 3-4 seconds for the charge to occur, when done you will see your invoice update to a Success screen similar to the one below. The receipt will automatically print but this sceen will give you the option to print it again and the ability to print a full invoice if you are also connected to a regular printer as well.
Note: Taking cash payments works similar to above but instead of selecting the "Send to Terminal" option you would select cash as usual. The add payment will open the cash drawer automatically and print your receipt.